Deploying LLM Proxy on Google Kubernetes Engine: A Step-by-Step Guide
- Diogo Azevedo

- Oct 18, 2024
- 3 min read
In our previous post, we explored the concept of an LLM Proxy and its importance in scalable LLM application architectures. In this post, I'll get more specific and guide you through deploying our open-source proxy solution, LLMstudio, on Google Kubernetes Engine (GKE). This powerful setup will serve as a scalable LLM proxy for your organization.
Quick reminder - why LLM Proxies?
LLM proxies are essentially components in the architecture that stand between the application itself and the LLM vendors. They provide many benefits that we mentioned in the previous post, but generally, they help centralize access to AI vendors like OpenAI, increase security, and enhance CI/CD.
Why Deploy LLMstudio on GKE?
As we mentioned in the previous blog post, a proxy server should not be installed on a single instance since it cannot scale and can therefore create a bottleneck for the organization. Therefore, choosing a Kubernetes deployment is useful as it helps automatically scale the solution thanks to horizontal pod autoscaling. Specifically, deploying LLMstudio on GKE offers some advantages that align with the needs highlighted in our previous discussion on LLM Proxies:
Scalability: GKE manages autoscaling automatically with excellent provisioning times for new pods and instances, reducing the risk of denial of service from the proxy.
Simplified Management: GKE abstracts the complexities of Kubernetes management, enabling you to focus on deploying and optimizing LLMstudio rather than infrastructure upkeep.
Integration with Google Cloud services: You can use other Google Cloud services like BigQuery to store logs or Google's Secret Manager to store keys to LLM vendors securely.
These advantages allow you to take a relatively simple proxy deployment and turn it into an enterprise-grade, production-ready solution.
Deploying LLMstudio on GKE
Let me walk you through the steps to deploy LLMstudio as a containerized application on GKE, effectively setting it up as your LLM proxy.
1. Navigate to Kubernetes Engine
Begin by logging into your GCP console and navigating to the Kubernetes Engine section.
2. Create a New Deployment
Go to Workloads and select Create a new Deployment.

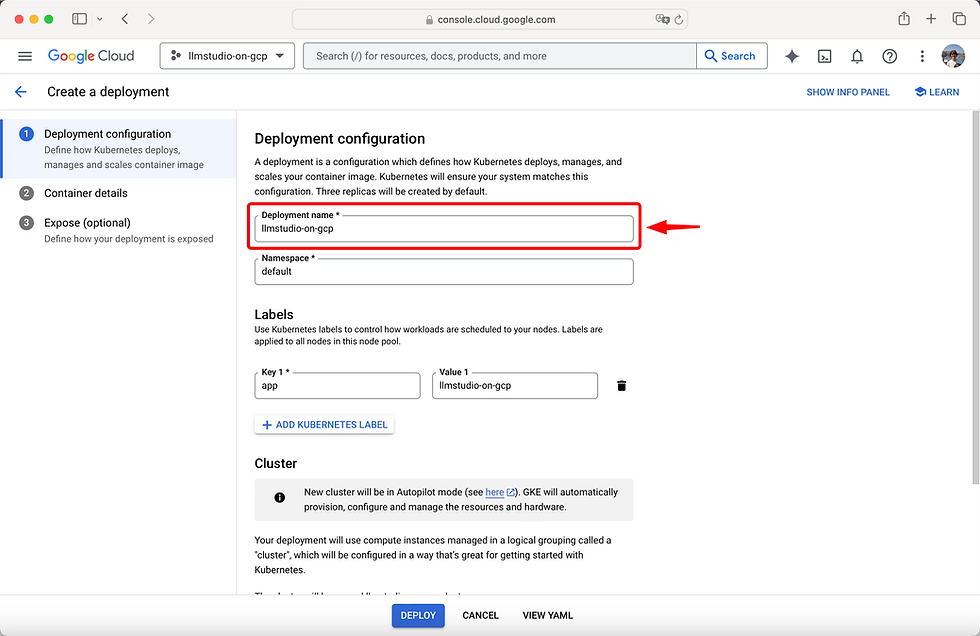
3. Name Your Deployment
Rename your deployment to something identifiable. For this guide, we'll use llmstudio-on-gcp.

4. Select Your Cluster
Choose to create a new cluster or use an existing cluster. We'll create a new cluster using the default region for simplicity.

5. Configure Container Details
After setting up the deployment configuration, proceed to Container details.
6. Set the Container Image Path
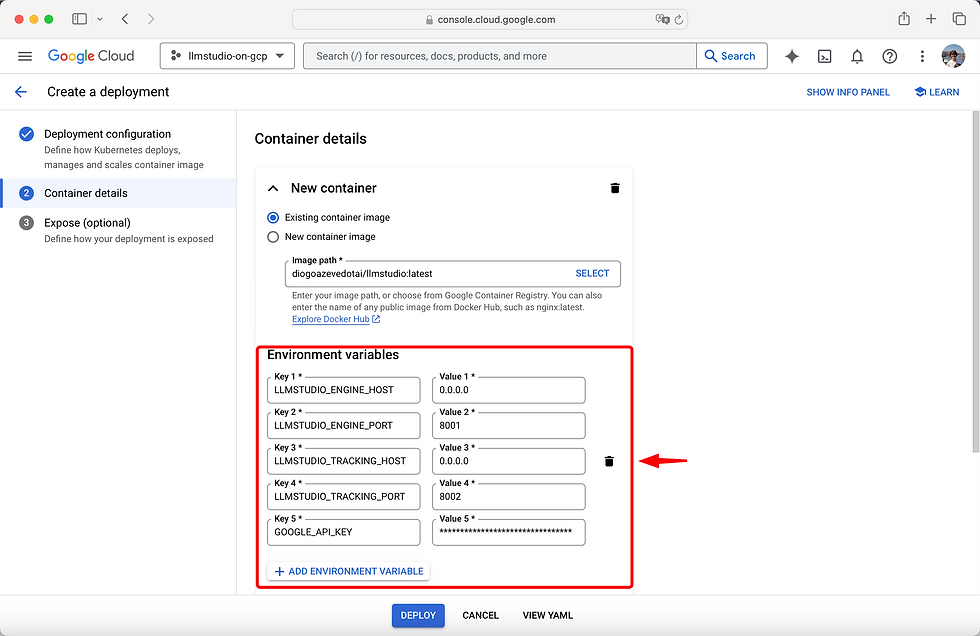
In the container section, select Existing container image and enter the path to LLMstudio's image on Docker Hub:
tensoropsai/llmstudio:latest
7. Configure Environment Variables
Set the mandatory environment variables as follows:
LLMSTUDIO_ENGINE_HOST | 0.0.0.0 |
LLMSTUDIO_ENGINE_PORT | 8001 |
LLMSTUDIO_TRACKING_HOST | 0.0.0.0 |
LLMSTUDIO_TRACKING_PORT | 8002 |

In this guide, we'll set the GOOGLE_API_KEY environment variable to enable calls to Google's Gemini models, as described in the LLMstudio documentation. For setting up environment variables for other providers, consult the SDK/LLM/Providers section of our documentation.
8. Expose the Deployment (Optional)
To make your service accessible externally, proceed to Expose (Optional).
9. Expose Ports
Select Expose deployment as a new service and keep the default settings for the first item.

Add two more items to expose the ports you defined in the environment variables.

10. Deploy
With all of this done, we are ready to press Deploy, and get our proxy up and running!
Make a call to your proxy
With LLMstudio deployed, let's make a call to verify everything is working correctly.
1. Set Up Your Project
Create a simple project with the following two files:
simple-call.ipynb
.env
2. Configure the .env File
Retrieve your endpoint's host from the Exposing services section of your deployed Workload.

Create a .env file with the following content:
LLMSTUDIO_ENGINE_HOST="YOUR_HOST"
LLMSTUDIO_ENGINE_PORT="8001"
LLMSTUDIO_TRACKING_HOST="YOUR_TRACKING_HOST"
LLMSTUDIO_TRACKING_PORT="8002"
3. Write the simple-call.ipynb Notebook
Now, to call our LLMstudio proxy, let's create a simple python notebook on Vertex AI workbench.
Start by importing LLMstudio:
from llmstudio import LLMSet up your LLM using gemini-1.5-flash:
llm = LLM('vertexai/gemini-1.5-flash')Finally, chat with your model:
llm.chat('Hello!')
print(response.chat_output)


Comments